
Merlin MRP College
Running the MRP System
Need some help? That is what we are here for!
In this class we deal with the Merlin MRP Factory 9
Running the MRP Process at Job Level.
Running the MRP Process in Shop Floor Control
Click Shop Floor Control on the Home Screen, select the Job you wish to process, and Run MRP on the Job Detail tab.
This will run the MRP Process for this Job only.

Doesn't look very exciting so far, does it? Well just you wait!
The top panel will deal with analysis of Subassembly Shortages, and if it finds any will populate the panel with buttons for Reports that go into detail of what is short, and what needs to have Works Orders and Subassembly Jobs created. With your approval at each step, it will then go on to take care of these for you.
Then the bottom panel will do exactly the same for Materials Shortages in the Top Level Assembly, and any Subassemblies.
So let go! Click the PROCEED button.

In the top panel, you get to see what would appear if there were Subassembly Shortages, but for your first run through we have chosen an Assembly with no Subassembly Shortages, which the little dialogue box in the centre tells us. There are two other levels at which the MRP Process can be run, for a Job Series or for all unprocessed Active Jobs. What time-savers they are! So we will deal with Subassemblies in the Tutorial to cover those, but the procedures are very similar in both panels, and you get all the on-screen help you need, so please don't be afraid to try it.
In the meanwhile, you will note that the QUIT button is nowhere to be seen. In order that you won't click it in error prematurely, it won't become active until the whole process is complete, but worry not, you aren't locked in. You can Exit at any time if you need to by clicking the X Exit button at the top right-hand corner of your screen.
You can then come back later, start again, and the MRP engine will check everything again, and pick up where you left off.
So, click that OK button and we move on to Materials Shortages.

The two active buttons you see will provide you with analyses of your materials shortages and what needs to be purchased. Click them in turn and view the reports to see what needs to be procured and why.
This is the Job Component Delivery Analysis
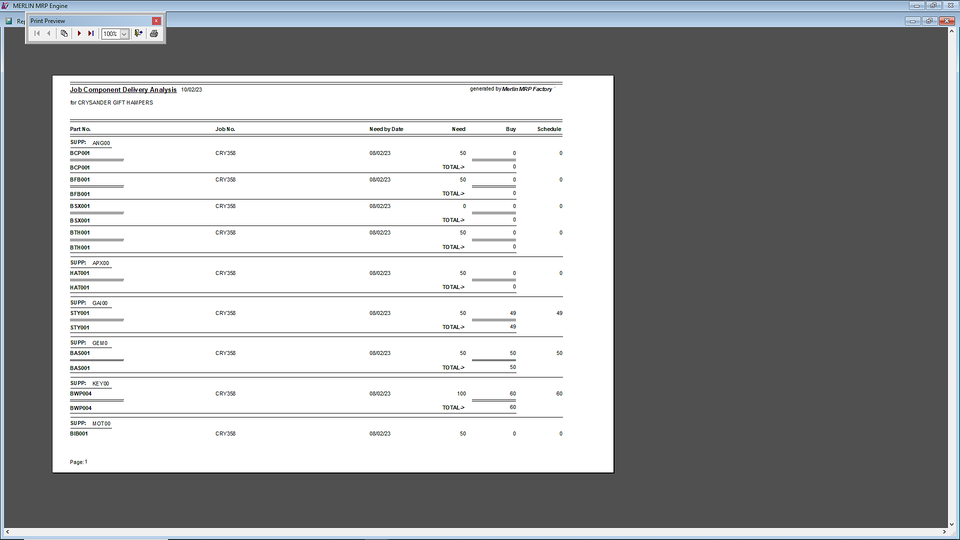
This is the first page Viewed on Screen. At the top left you can see the Viewer Control Panel, which allows you to move between pages, rescale the image, click the Print button if you want a hard copy, and click the little door icon to close the viewer.
This shows you what you need and when you need it, and what you need to procure to make up Shortages, and will Schedule Deliveries on a JiT basis. The MRP Process is going to do all this for you at the click of a button, raising the Delivery Schedules as well as the POs for Suppliers who will accept Call-offs, and where you have ticked the box to confirm this on their CRM Card.
We elected to include in-Stock items in this report (you can choose to exclude them) and for those items you can see that you obviously don't need to procure further supplies, and the system will not generate POs for such items..
This is the Job Component Purchase Requirement

Of critical importance here is the Days Error column. These show that the Lead Days for delivery of the parts is later than the Start Date of the Job requires. The greatest error is shown at the bottom, 7 days in this case, so yo have two clear options. Either Reschedule the Delivery Date seven days later for the Job in Sales Orders & Jobs (Merlin will the recalculate the Start and Finish Dates), or see if your Supplier can deliver more quickly. If not, you might try one of your alternative Suppliers, and if they can help, set the Next Order Purchase to that Supplier on the Resource Record Cards for the Parts in question. If the latter were the preferred option, then this would be a good point to use that X button to leave the MRP Process, and come back to it when the supply issue is resolved. Otherwise you can carry on here, and then amend the Job dates afterwards. This underlines the importance of setting the Lead Days carefully for Suppliers and in the Assembly Defiinition, and for refining the process by including Manufacturing Processes in your BoMs.
For simplicity, let's assume you can amend the Job Delivery Date, and carry on here.
So, having read the Reports, and perhaps returning here after resolving the supply issue, click the Commence Materials Purchase Sequence. You will be offered the Proposed Purchases list to view or print. There should be no surprises there as you have read the Reports, but of course, check to make sure you didn't miss anything. Merlin will then offer to Print Purchase Orders?, to which you reply YES if you are now happy with everything.
You will then see the following dialogue box.

The Scope in this case being the single job. Just click OK. This makes sure that these materials can't be taken for another Job.
You will then see a button offering to Schedule Deliveries. Providing you have ticked the box in CRM indicating which Suppliers accept Call-offs, this will be done for any of these you are using here. If there were none, you will be so advised.
The QUIT button will by now be active again, and as there is nothing more to do here, just click it.
Any Questions? Please contact us on the HelpDesk. Otherwise, click Overview to go back
© Copyright. All rights reserved.
We need your consent to load the translations
We use a third-party service to translate the website content that may collect data about your activity. Please review the details and accept the service to view the translations.