
Merlin MRP Software
System Overview and Merlin MRP College
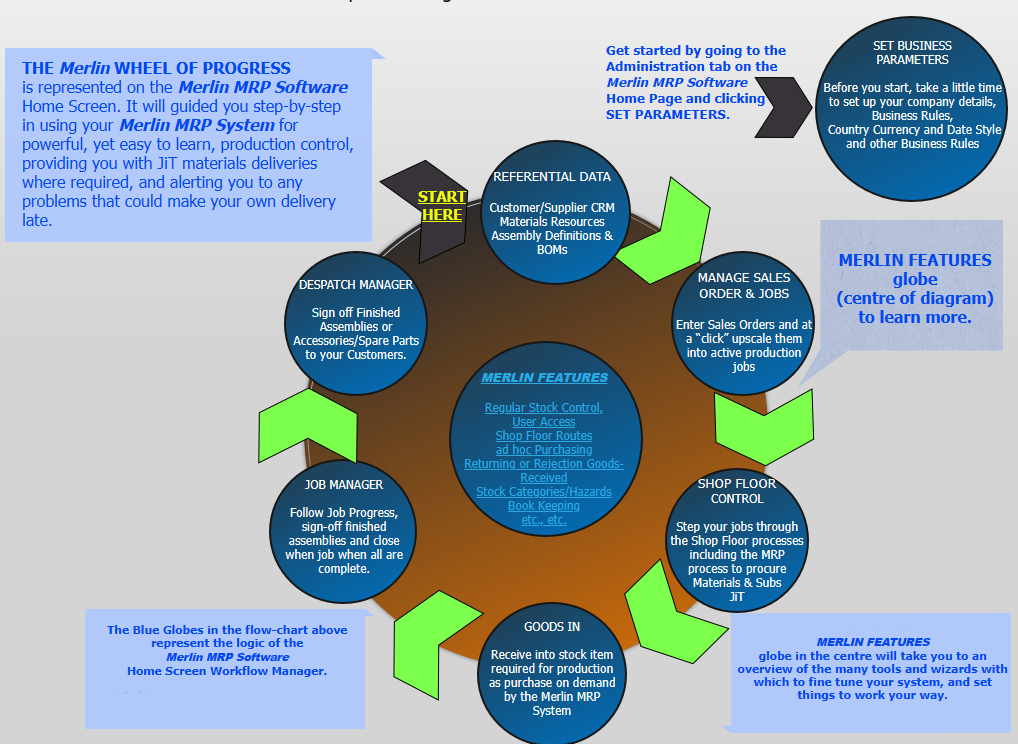
The Simple Flow Logic that turns sales orders into finished assemblies, despatched to your customer with a Delivery Note and/or a Sales Invoice.
To try the software for yourself and learn how to us it, you can download it free of charge (no card needed) from our Downloads page, and install it, following the directions on the Download Centre page.
Then you can get to work straight away, using the
Getting Started guide below.
The Merlin Home Screen
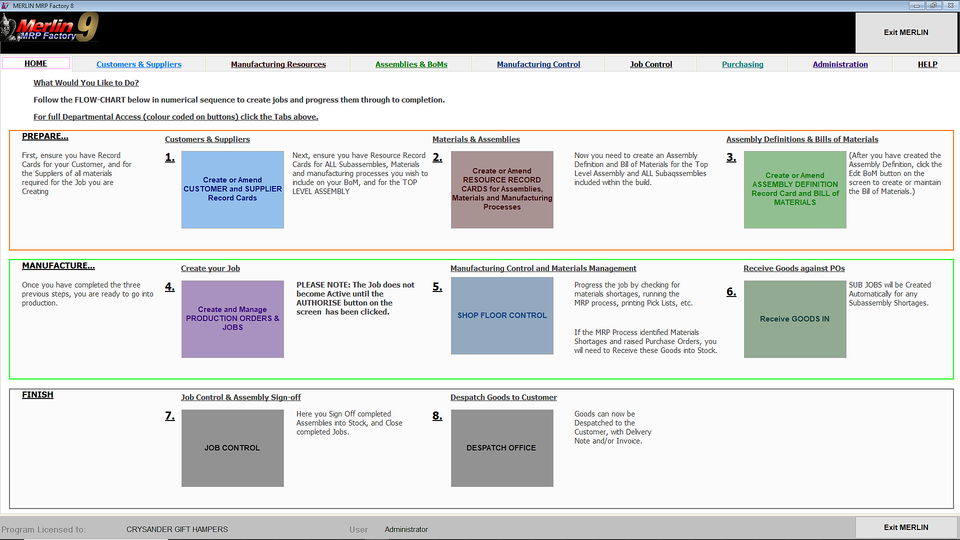
This is your point of arrival after you log into Merlin MRP Factory 9. The program will nag you to enter your Company Info. until you do so. You can defer this until you start working with the system (or evaluating) when the system will need to refer to it.
The tabs along the top will take yo to menus for specific departments (CRM, Resources, Assemblies and BoMs, etc.) colour-coded to match the buttons on the Home Screen. But you can do all you need to create a new job, and see it through to completion, by following the flow of buttons that you can see.
Full Getting Started guide below.
Welcome to the
Merlin MRP College
If you are new to MRP or to Merlin,
We'll have you up and Running in Minutes!
Did you take a good look at the Merlin Wheel of Progress above?
We'll walk you through every step of the way in Getting Started, and then we'll move on to some of the many amazing tools that Merlin has to help you get your job done quickly and easily.
Within 10 minutes of entering this site, you could be setting up your first MRP Job!
Getting Started
If you are a new user, the first thing you need to do is download the FREE Educational & Evaluation version of the software so that you can learn by doing and which, if and when you are ready to go live, you can update to Commercial User by buying a Merlin Key.
Just by following the simple steps from the START HERE arrow in the graphic above, you will be able to setup, and progress though to despatch, your first Manufacturing Job. As with all powerful industrial grade software there is a learning curve, so if you a new to MRP software just take it step-by-step and remember, we are here to help. Each Merlin Screen has a Form Information tab and a Help tab, which will tell you all you need to know before entering data, and, of course, the Tutorials below. There might seem like a lot of work to do, but it takes much, much longer to explain it than to do it!
We'll Start with the Basics!
Before you can do anything else, you need to enter a bit of data for your first job.
If you already have this in electronic form (e.g. spreadsheet) we can import it into your Merlin System for you.
Let's Start by entering your Company Details in Administration > SET PARAMETERS and Business Rules. Nobody except your Merlin Users will have access to this.
Click me for Business Parameters Tutorial
Right, let's get some data entered. First you will need:-
CRM for your Customer (tick the Customer? checkbox), and for each Supplier from whom you will need materials for this Job.
On the Home Screen Click Button 1 to do this.
Next, you will need a Resource Record Card for your Top Level Assembly (we will come to subassemblies later), setting the Supplier Code to HOUSE from the drop-down on the Suppliers tab, and for every piece part that you will need for your Bill of Materials (BoM) for this assembly.
On the Home Screen Click Button 2 to do this.
Now you can Define your First Assembly
But first, you will want to enter some stock for the parts you have created. We will deal with Merlin's Stock Control and Purchase Order Management in the Advanced section.
For now, click the Manufacturing Resources tab at the top of the Home Screen and then click the Enter MANUAL STOCK MOVEMENTS button to bring into Merlin Resources any inventory you already have.
Click Me for MANUAL STOCK MOVEMENTS Tutorial
With the referential data in place, your first job is to create an Assembly Definition and a BoM for the assembly you wish to make.
On the Home Screen Click Button 3 to do this.
Click Me for ASSEMBLIES & BOMs Tutorial
With the BoM finished, you are good to go. You can now create your first production Job.
On the Home Screen Click Button 4 to do this.
You know what do do now! Click the Help tab for vital information, then click the NEW button and enter the data as required.
Let's get that First Job Moving!
OK, we now have to get our job moving through the Shop Floor. You may have numerous workstations or production lines, which can all be added to the system and controlled, but we will come to that later. Let's keep it simple for now and get this Job done.
On the Home Screen Click Button 5 SHOP FLOOR CONTROL to do this.
Remember to check out that Help tab!
Click me for Shop Floor Controller Tutorial
Which brings us to the Jewel in the Crown, the Star of the Show, the Main Event and the point of it all, the Merlin MRP System! You will have seen the button for it in Shop Floor Controller. Here is how you use it.
Click me for Merlin MRP Procurement Tutorial
So, after that do you need to Receive Goods In to completer this Job? Did you run the MRP Process in Shop Floor Controller? If so, and PO(s) were raised by Merlin, you need to Receive Goods into Stock.
On the Home Screen Click Button 6 Receive GOODS IN to do this.
Remember to check out that Help tab!
Click me for Receive Good In Tutorial
Now We'll get that job done and Dusted
Nearly there! With materials in stock, now it it is time to Sign-off completed assemblies and subassemblies. Click button 7 JOB CONTROL on the Home screen.
Click me for Sign-off Assemblies and Close Jobs Tutorial
So, you are now ready to Despatch your Finished Assemblies to your Customer. Click button 8 DESPATCH OFFICE on the Home screen.
Click me for the Despatch Office Tutorial
So you have now been right around the Merlin Wheel of Progress, so Pass Go and collect £200. Or whatever you first Manufacturing Job was invoiced for.
Do it once or twice more and it will all seem so quick and easy that you will begin to realise that the amount of time Merlin MRP Factory can save you is nothing short of astonishing.
Not just minutes, hours, or even days. Over the course of the year you can save weeks or even months of man-hours in making sure you have all your Kit Lists studied, Materials Shortages counted and calculated, Ordered and in Stock when you need them of the Production Line Floor.
Happy Manufacturing!
Now a bit More Depth
The Getting Started section should have given you a good insight into the Merlin MRP System. Time now for a bit more depth.
Administration
One of the first things to do when you start using Merlin is to SET PARAMETERS and Business Rules, if you haven't done that yet. If not, now is the time!
Click me for Business Parameters Tutorial
Also, for security reasons you should change the default Administrator Password that came preinstalled in the Merlin MRP Software system, and you might also need to create additional User Accounts and set their Privileges.
Click me for User Accounts Tutorial
Managing Stock Locations and Multiple Locations for the same Stock item.
Manufacturing Resources
In the Getting Started tutorials you met the Merlin MRP System at Job Level, but there are in Merlin three different ways of buying materials:
1. Stock Control, for materials that you want always to have on the shelf.
Click me for Stock Control Tutorial
2. The MRP Process, which is Just in Time (JiT) procurement that can be run Job by Job, at Job Series Level, or for all Active Jobs which have not yet been so processed.
3. Ad-hoc Purchasing for procuring items not covered by either of the above, whether by accident or design.
Assemblies & BoMs
Assembly Costing is another fantastic time-saver that this MRP System has to offer.
Select the Top-level Assembly and Merlin will drill right down to the bottom of the Subassembly tree, then work its way back up, Costing each Subassembly as it goes, so that it is correctly valued in the BoM for the next Parent Assembly.
Then the cost of the Materials and Manufacturing Processes for each are calculated and updated, giving a comprehensive Costing for the Top-level Assembly and the Subassemblies, which are written back to their Resources Record Cards.
Click me for Assembly Costing Tutorial
Manufacturing Control
In the Merlin MRP System you can define as many Shop Floor Routes as you physically have in your plant.
A "Shop Floor Route" can be a single Bay where an Assembly is built from start to finish, or a Production Flow point, where as each Assembly Process is completed, the items is handed-off to the next Production Process down the line.
This is very important in optimising your Shop Floor Schedules.
Click me for Shop Floor Routes Tutorial
From time to time you will need to undertake the dreaded chore of Stock Taking! Hey ho, we have streamlined it as best we can.
© Copyright. All rights reserved.
We need your consent to load the translations
We use a third-party service to translate the website content that may collect data about your activity. Please review the details and accept the service to view the translations.